- Firstly, make sure that you have a developer unlocked Windows Phone (7/8/8.1) device. If you don’t, follow this tutorial to unlock your phone. It’s free.
- Download the Windows Phone Mini SDK or the Full SDK as needed (download links in the above tutorial). However, if you have a developer unlocked phone, chances are that you already have it installed on your PC; so skip.
- Connect your Windows Phone Device to your PC using a Data Cable.
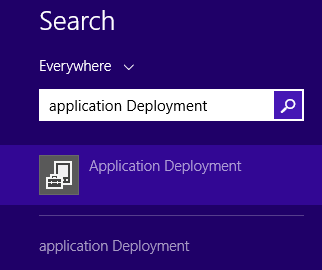
- Click on Start and type Application Deployment. Then launch the Application Deployment app.
- Set Target to Device.
- Click on Browse in front of the XAP field and locate your downloaded (cracked) or self-packed XAP file.
- Make sure your device’s screen is unlocked. Then click on Deploy at the bottom right of the window.
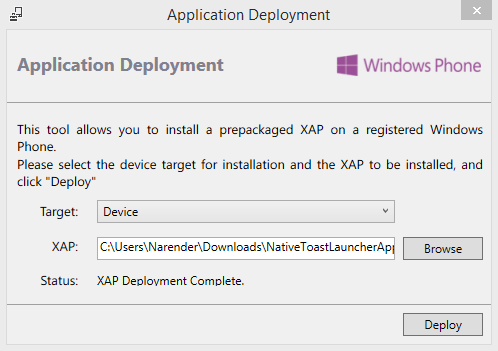
- After a few seconds, the application will show a XAP Deployment Complete status.
- The app has been deployed. You can now disconnect your phone and start using the deployed app.
Wednesday, January 27, 2016
Deploying XAP using Windows Phone SDK/Mini SDK
How to: Developer Unlock a Windows Phone for Free
Windows Phone limits the deployment/installation of non-store apps to only Developer Unlocked phones and still carries a limit of max 3 apps for users without a Microsoft Developer Account. If you are looking to Developer Unlock your Windows Phone (regardless of the manufacturer), follow the tutorial below. There is also a scheduled post upcoming which discusses about installing/deploying local/cracked apps to developer unlocked phones.
Register a Windows Phone for Development (Developer Unlock)
- If you are just an end user who wants to unlock the phone to deploy some apps, download the Windows Phone Mini SDK (64MB) from here.
On the other hand, if you are a developer and plan to build apps, you should download the Full WP8 SDK from here. - Install the Mini SDK or the Full SDK on your Windows PC.
- Connect your Windows Phone device to the PC using a USB Cable and wait for the drivers to be installed (if they are not already installed).
- Click Start and type Developer Registration. Now open Windows Phone Developer Registration app.

- Register for Development
- Make sure that the screen of your Windows Phone is unlocked and click on Register in the bottom-right of Developer Registration App. Click retry if it says that the phone is not detected.
- Login by entering your Microsoft Account credentials. You do not need to be registered as a developer to do the unlocking, hence any Microsoft Account will work.
- Let the Developer Registration app register your phone for development and you can deploy local/cracked apps thereafter.
How to Bypass Android Factory Reset Protection
With the release of new android i.e. Android 6.0 Marshmallow, Google has introduced a new security feature with it. Now when ever you factory reset your phone with recovery and after reset boot your phone, then the device will ask you to verify your previous Google Account. If you don’t remember it then you can’t have access to the device.The main aim for introducing this security feature is to prevent selling of stolen device. But there’s a trick to bypass this security feature.
Steps to Bypass Android Factory Reset Protection
- After you have done Factory Reset, turn on the phone.
- Now when it say to verify your Google Account, connect your phone to computer using OTG cable.
- Now when you connect the cable, the device “File Manager” will automatically open up.
- Now download and copy the apk and move to your device using computer. Download the apk required for this process from here.
- Navigate to the location where the apk is saved on your device and open it.
- Now it will prompt to go to Settings and Enable Unknowns Source. Do it.
- Now install the apk and open it.
- This application will take you to setting.
- Now scroll down to “Backup And Reset”.
- Click on “Factory Reset>Reset>Rest All”
- The device will reboot, but this time it won’t ask to verify the Google Account.
- That’s it. Now you have Bypass Android Factory Reset Protection.
The reason why it doesn’t ask for verification on after doing factory reset from device setting is that, when your do the factory reset for second time, there’s no Google Account logged in. If you found this method working on any other device, then let us know about it using the comment section.
How To Earn Money With Revenue Hits In Blogger

Revenue hits is a newly introduced ad network and it is best alternative of Google Adsense after Infolinks. It is not better as Adsense but it is not less in any way. If you have only 100 views per day you can earn good with Revenue Hits. It has all types of banners and mobile ads too. CPM as well as CPC rates are also high. Apart from it you have opportunity to refer people using your link. Revenue hits says that you can earn upto $100 per referral. It have all types of referral banners too. After personally reviewing it I recommend it for publishers. This post is a review of revenue hits and a tutorial about how to use revenue hits to earn money via blogger blogs.
Features(Review):
- High CPM rates.
- All size banners are available.
- High CPC rates.
- Pop-up and bounce ads.
- Earn $10 to $100 for referrals.
- Slide out and shadow ads available.
- No minimum traffic required.
- Perfect traffic and click tracking analytics.
- Worldwide coverage.
- Fast account activation.
- Easy to setup ads.
Payment Methods And Minimum Payout Threshold:
You can payout with Paypal, Payoneer and Wire. Minimum payout threshold is $20 for Payoneer and Paypal while $100 for wire transfer.
How To Sign Up?
Step 1: Go to Revenue Hits.
Step 2(Site/App Information):
Type your site name, url, description, select type as website and select category of your site.

Step 3(Partner Information):
On the second page type your username, first and last name, your email and password. You can also enter your skype name but it is not required.

Step 4: Set your Payment type as decide later or if you want to set your paypal account or payoneer account select it and fill out details.
Step 5: Scroll down and click on "I agree to these terms and conditions".
Step 6: Finally confirm your account by going to your Email > Inbox > Revenuehits Team. Click on the link in the email you just received and open it to activate your account.
How to add revenue hits ads in blogger?
Step 1: Go to Revenue hits and login to your account.
Step 2: Click on "New Placement" on the right side of the page and choose the "Desktop Placement".

Step 3: Select your placement type from the given options e.g banner, shadow ad, slider, top bar, pop-under etc.
Step 4: Customize your ad and click on save.
Step 5: Preview your ad by clicking on an eye's icon to see your ad. Just beside it click on </>to get your ad's code.

Step 6: Copy the code and go to blogger dashboard.
Step 7: Navigate to "Layout" and click on "add a gadget".
Step 8: Click on Html/Javascript and paste your ad code.

Step 9: Click on save and you are done. Open your blog to see your ads.
You can also create ad campaigns for your mobile site. Just choose mobile placemen in the step 2 and follow other steps as they are.
Record A Screencast With YouTube
Here’s a step by step guide on how you can make screencasts of your desktop windows with YouTube.

Step 1: Sign-in to YouTube with your Google Account, click the Upload button in the upper left corner and choose Events under Live Streaming. If you never done this before, YouTube make require you to verify your phone number to enable streaming.
Step 2: You are on the Create Event page. Give your screencast video a title, set the privacy of the video to either Unlisted or Private and click the “Go Live Now” button.
Step 3: This will open the Hangouts on Air page. You can click the camera icon to turn off webcam recording. Similarly you can toggle the microphone icon if you do not wish to record audio.
Step 4: Now click the Screenshare button in the left toolbox and select a desktop window that you wish to record for your screencast. Remember that if you using multiple virtual desktops, it will only show program windows that are active on the current desktop.

Step 5: Click the Start Screenshare button to share your screen and then click Start Broadcast to start recording the screen. This is a private session so nobody can watch your broadcast while it is being recorded. When you are done with the recording, click the Stop Broadcast button and switch to the YouTube website.
How to loop youtube videos
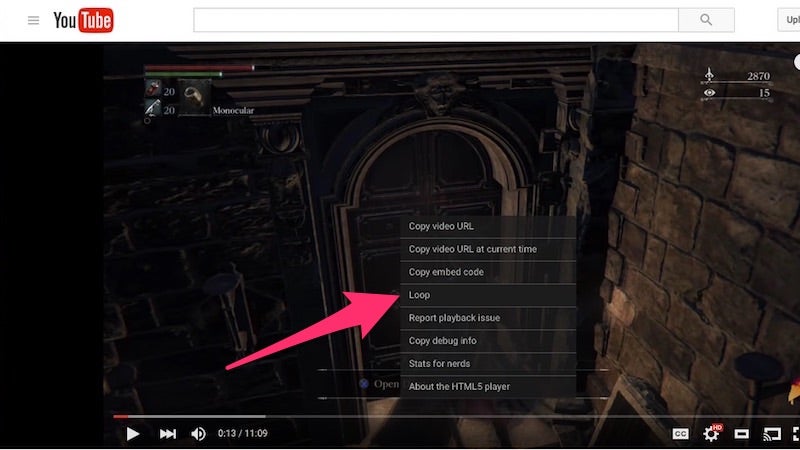
If you wanted to loop videos on YouTube, you used to need extra software. Now, it’s built right into YouTube itself.
All you need to do is right-click a video, select the “Loop” option, and the video will loop over and over again. Whether you have a song stuck in your head and just want to hear it on repeat or you’re trying to kill a laptop’s battery, it’s now a lot easier to do.
All you need to do is right-click a video, select the “Loop” option, and the video will loop over and over again. Whether you have a song stuck in your head and just want to hear it on repeat or you’re trying to kill a laptop’s battery, it’s now a lot easier to do.
How To Put Android On Your Desktop With Remix OS

Android isn’t exactly built for a keyboard and mouse, but that hasn’t stopped some of us from trying. RemixOS, from developer Jide, wants to change that by adding features including a desktop and windowed apps to Android. Here’s how to try out the very experimental alpha.
Disclaimer: According to Jide’s website, this OS is “for developers and early adopters who don’t mind a bug or two”. In our testing, there were considerably more than two bugs. While RemixOS is an awesome concept and it’s fun to play around with, don’t expect this to replace your current computer anytime soon. However, if you’re into being on the bleeding edge, tweaking your computer and playing around with experimental software (which might explain why you’re reading Lifehacker), by all means, continue.
What You’ll Need

- RemixOS for PC package: You can download the installer package for RemixOS from here. The package is just shy of 700MB, so if you’re on a slower connection, start the download and then grab a snack or something.
- An 8GB+ USB stick with 20MB/s write speeds: RemixOS requires a minimum of 8GB of free storage to install and run. If you plan to use Resident mode to keep your desktop persistent, you’ll obviously want more. Also, Jide recommends a stick with 20MB/s write speeds (the SanDisk Extreme should work very well). In my testing, I found that a stick with less than 10MB/s write speeds worked, but it threw an error and took a while to load. Note: Creating the RemixOS drive will wipe your USB stick, so be sure to backup any files already on it.
- An x86-based computer: RemixOS is an x86 variant of Android and, as such, it only runs on computers with Intel and AMD processors. ARM-based computers (such as many Chromebooks) and older Macs will not work. You’ll also need a Windows PC in order to create the USB stick.
- Boot-from-USB enabled: Most computers these days have the ability to boot from USB, but check your BIOS or model to make sure.
Create Your RemixOS USB Stick
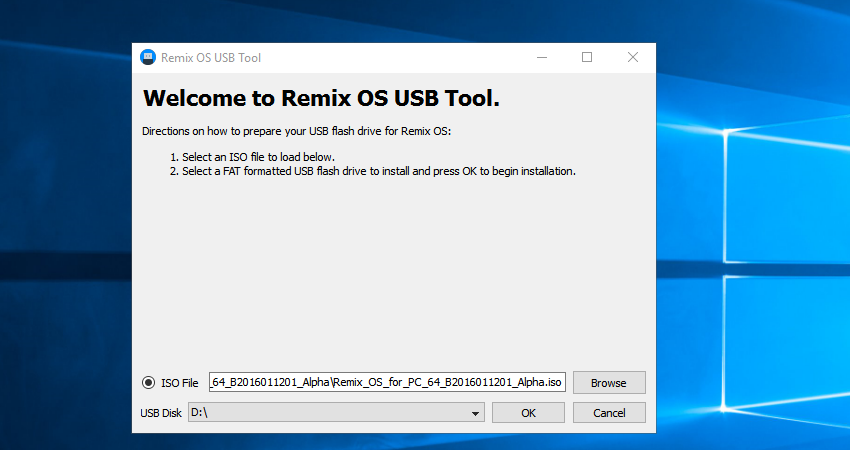
- Plug in your blank USB stick.
- Extract the files in the RemixOS for PC .zip file.
- Launch the RemixOS USB Tool executable file.
- Next to “ISO” click the Browse button and choose the RemixOS .iso file.
- Next to “USB Disk” choose the drive letter associated with the USB stick you plugged in.
- Click OK.
- Guest Mode: This allows you to preview how RemixOS works. Any apps you install, settings you change, or files you download will be erased as soon as you turn off your computer.
- Resident Mode: This will treat your USB stick like a portable computer. Any settings you change will be remembered, no matter which computer you plug it into. Apps you install and files you download will be written to the USB stick. This means the bigger your USB stick is, the more space you’ll have to install things.
Install Some Applications (Like Google Apps and the Play Store)
Despite how the promotional material looks, RemixOS does not come pre-installed with the Google Play Store, or any of the related Google apps. Previous limited release versions of RemixOS did, so it’s unclear if this is an oversight, or if Jide simply doesn’t have the licence to distribute the Play Store publicly.Fortunately, you can still download and install applications on your own. APK Mirror is an excellent site that has recent versions of tons of popular apps, including Google services. To get apps for RemixOS, follow these steps:
- Search APK Mirror for the app you want to install.
- Ensure you have the correct version, where applicable. For reference, RemixOS runs Android 5.1.1. (To install Google Play Services, you’ll need versions ending in 270, per APK Mirror’s instructions here.)
- Open the Settings app, click Security, and enable installing from “Unknown sources”.
- Launch the Downloads app and click the APK you downloaded, then follow the prompts to install it.
So, How Is It?
After all that, you’re probably wondering if it’s worth going to all the trouble. Well, here’s the short answer: kind of? I’ve played around with it for a few hours since the release last night and I’ve run into enough problems that would keep most casual users away. But that’s OK! It’s a developer and enthusiast-focused alpha. What does work, however, paints a pretty rosy picture for Android on the desktop.For starters, RemixOS has tweaked Android’s basic interface to feel a lot more at home on the desktop. There’s a taskbar at the bottom of the home screen for launching apps, a Start-like menu for searching your files and finding other apps you have installed, and a system tray for things like Wi-Fi connections, date and time, and a slide-out notification tray. Frankly, it looks a lot more like a clone of Windows 10 than it does Android.
Android apps also scale pretty well. RemixOS allows you to arbitrarily resize windows, much like you do on Windows and OS X. That might seem like a no-brainer, but keep in mind that Android apps were never designed for this kind of interface. Despite that, the feature works pretty flawlessly. If you make a window small enough, the app will default to a phone-style interface. Larger windows will use tablet-style interfaces, where available. This means that the app experience on Android is still only as good as Android support for tablet apps, which is good, but not stellar.
Ultimately, the problems with app compatibility means that RemixOS is unlikely to replace anyone’s daily driver. However, given that Android was never intended to be a desktop operating system, RemixOS does a remarkable job of convincing us that it could be.
How To Stop Videos From Auto-Playing In Four Popular Browsers
Whether it’s a music clip on YouTube, a Flash ad on a news site or the latest viral sensation on Facebook, most videos you come across on today’s web want to get going without any input from you — and that can cause problems with bandwidth as well as audio output you weren’t expecting. Here’s how to tackle the issue in your browser of choice.
One of the difficulties in addressing the problem is we’re right in the middle of a transition between old and clunky Flash and the new, streamlined HTML5 as far as video formats go. The momentum is definitely behind the latter, but you’re still going to come across plenty of sites using Flash, so you really need to block both types to be safe.
After following the steps below, the problem should be minimized for the most part. But even after applying these changes, you can’t be completely sure you one or two videos won’t slip by — some publishers use custom-made code to fool your browser into thinking it isn’t dealing with a video.
 For the older Flash technology, you can block this at source, as it’s built into Chrome. Head to the Settings tab, open the advanced settings selection, and then click on the Content settings button. Under the Plugins heading, tick the checkbox next to “Let me choose when to run plugin content”.
On some sites, this should be enough, but we found plenty of adverts getting through the net. To completely stop the flow, click Manage individual plugins and untick the “Always allowed to run” entry next to Adobe Flash Player
This does mean you’ll have to activate Flash on sites that rely on it to work (like Rdio, for example), but this should be a one-time thing you can take care of via the blocked plugin icon that appears in the address bar — it’s a small price to pay for some peace and quiet. You can always go nuclear and disable Flash completely if you prefer.
 As for Flash, open up the Firefox menu and choose Add-ons; if you click on Plugins from the subsequent screen you can select Ask to Activate from the drop-down menu next to Shockwave Flash. Any Flash videos will then need to be clicked on before they play (as with Chrome, this may interfere with some perfectly useful sites as well).
That should be enough to stop videos from playing, but sites and advertisers change their code on a constant basis and browsers don’t always manage to keep up. A variety of third-party extensions are available for Firefox too, from FlashStopper to Stop YouTube HTML5. The former replaces both Flash and HTML5 content with a thumbnail, and you may prefer it to the rather rudimentary blocking features in Firefox itself.
 As for the old-school joys of Internet Explorer, you can choose Safety and tick ActiveX Filtering to block some kinds of content; another option is to choose Tools then Manage add-ons to get access to the Shockwave Flash plugin. Right-click to disable it, or choose More information to remove it from one site in particular.
The steps for IE described above are the ones most commonly recommended, and they stopped some auto-playing content, but plenty still got through — it seems that Chrome and Firefox are much more effective at blocking this behaviour than either the old or new browsers from Microsoft. If you know of a foolproof way that works, let us know.
One of the difficulties in addressing the problem is we’re right in the middle of a transition between old and clunky Flash and the new, streamlined HTML5 as far as video formats go. The momentum is definitely behind the latter, but you’re still going to come across plenty of sites using Flash, so you really need to block both types to be safe.
After following the steps below, the problem should be minimized for the most part. But even after applying these changes, you can’t be completely sure you one or two videos won’t slip by — some publishers use custom-made code to fool your browser into thinking it isn’t dealing with a video.
Google Chrome
As far as HTML5 is concerned, you’re going to need some third-party help to stop playback. From the extensions we’ve seen, Disable HTML5 Autoplay seems to be the most comprehensive and effective option, though a small number of users report that it doesn’t work. It effectively stopped clips from playing on YouTube and Facebook when we tested it.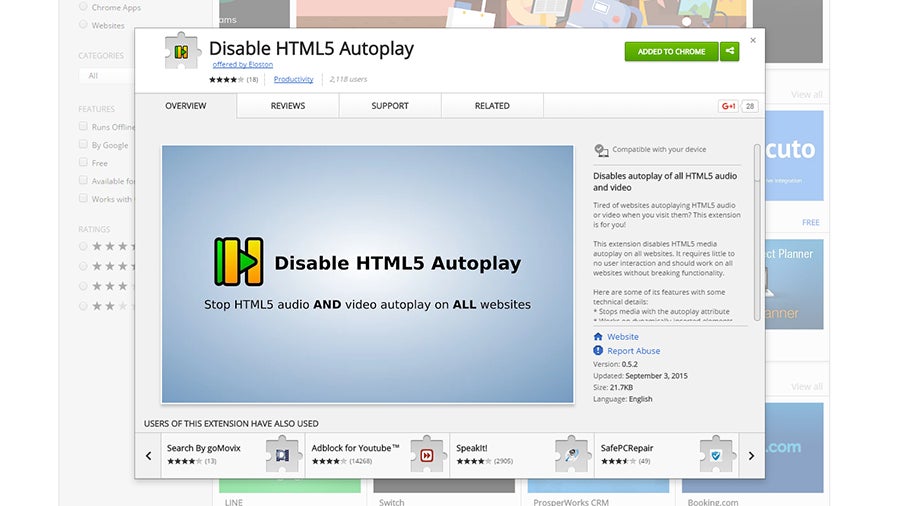
On some sites, this should be enough, but we found plenty of adverts getting through the net. To completely stop the flow, click Manage individual plugins and untick the “Always allowed to run” entry next to Adobe Flash Player
This does mean you’ll have to activate Flash on sites that rely on it to work (like Rdio, for example), but this should be a one-time thing you can take care of via the blocked plugin icon that appears in the address bar — it’s a small price to pay for some peace and quiet. You can always go nuclear and disable Flash completely if you prefer.
Mozilla Firefox
In Firefox, HTML5 that can be disabled through the browser’s own settings. Type “about:config” into the address bar, click through the warning and search for “autoplay” options — double-click on media.autoplay.embed and the value changes to false.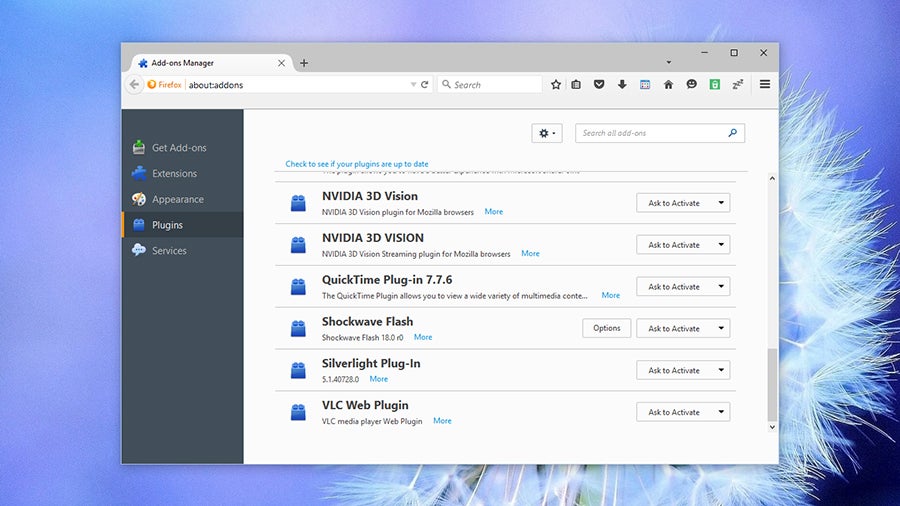
That should be enough to stop videos from playing, but sites and advertisers change their code on a constant basis and browsers don’t always manage to keep up. A variety of third-party extensions are available for Firefox too, from FlashStopper to Stop YouTube HTML5. The former replaces both Flash and HTML5 content with a thumbnail, and you may prefer it to the rather rudimentary blocking features in Firefox itself.
Microsoft Edge and Internet Explorer
With Microsoft Edge still at such an early stage in its development — and with third-party extensions not yet supported — there doesn’t appear to be any way yet for you to stop video content from automatically playing. If you go into the advanced settings for the browser, you can supposedly turn off Adobe Flash Player, but it had no effect on the sites we visited (your mileage may vary).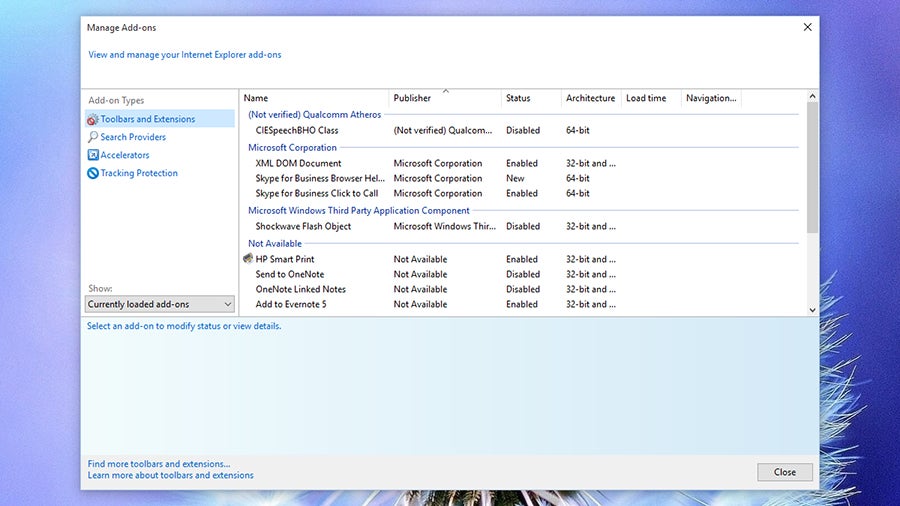
The steps for IE described above are the ones most commonly recommended, and they stopped some auto-playing content, but plenty still got through — it seems that Chrome and Firefox are much more effective at blocking this behaviour than either the old or new browsers from Microsoft. If you know of a foolproof way that works, let us know.
Subscribe to:
Comments (Atom)